bacground

Friday, May 17, 2013

Vintage Paper Flower Wreathe

Saw this project on Pinterest, and saved it to make...you can find the instructions here...it was easy enough to make...only I grossly underestimated how many flowers I needed...took me a week to get them all made...the wreathe is 12" and I used an old dictionary I got at a used book sale, strictly
 for crafting...some dollar store tulle to hang it up, and voila...another completed project!

 Oh...and one of our adorable pooch, Cheyenne...gotta love that face!!!

Wednesday, May 8, 2013

Printer's Drawer Upcycle

Ah....being off work is wonderful...I get so much done...today I worked on an old printers drawer I purchased last weekend at a yard sale for $5.00...such a deal...after much pinteresting...I decided to fill it with family pics and a few embellies...especially after my daughter noticed that for how many pictures I take and being a scrapbooker and all...there are no pics of us on the walls of our home...GASP!!!!!!! How could this happen...well...I guess I haven't hung any up since we moved...but this will make her happy!!! I used various scraps of paper, some chipboard, wood letters, flowers, metal letters and a diecut to complete the project...hope you like it!
 I love how it fits perfectly in this little nook in our hallway, and although it is now on an existing shelf, I think I will have hubby hang it up


Sunday, April 28, 2013

This is what I've been busy with...

Well, its been a long time since I've posted anything...sorry 'bout that...we moved just before Christmas 2012...hosted dinner, attended 9 parties, hosted Christmas dinner and an open house...whew...I get tired just thinking about it. Crafting of any sort took a back seat for a while, and although I love card making, I have taken to some other crafting. The house we bought is from the 1870's, and it is a total "pinterest" house...I have had so much fun painting and doing decor projects to fill the walls. I thought I would share some of them with you...I'm really big into the upcycling right now and that has fueled many of my projects...
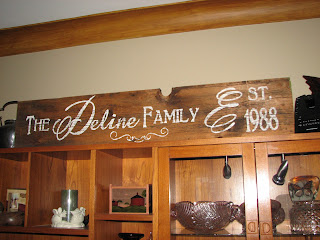
 So this first one is a wood sign. Hubby found about 5 pieces of old old wood in the garage of the house we bought, and we both thought they would be perfect for an old sign. After searching pinterest for ideas on how to best execute my project, I came up with a plan. Started with my Sure Cuts a Lot software and designed the words, cut a mock up out of scrap paper to make sure everthing was sized right, which it wasn't, so back to square one...after getting the sizes of the fonts right, I cut the letters out of my wall pops material...love this stuff. After it was cut, I "weeded" out the letters, leaving the negative space (don't forget the centers of the letters), then I cut a piece of transfer tape to fit the mat, and carefully placed it on the negative portion...lifted it, peeled the backing off and placed it on the wood...lifted the transfer tape off, which left me with a stencil of sorts, that I smoothed down really well. Took some antique white craft paint and sponged over the stencil, as soon as I was done sponging, I removed the wall pop stencil and took it to show hubby...and he oooooohed and ahhhhhed and said all the right things (smart move) and then promptly placed it on top of our living room wall cabinet.
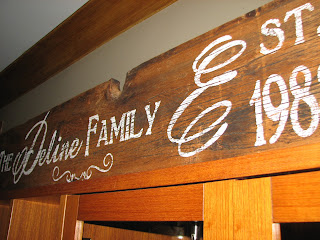
 I love how the cracks in the wood make the paint look old and worn...I love a successful project!
This was a project I completed for our front porch...which hubby closed in and finished...looks awesome! This is a 16 x 24 canvas that I painted...had to mix some colors up to get what I wanted, a teal of sorts...anyway...then took some expresso paint and lightly brushed the edges up and then rolled with the teal roller over until it was all blended and looked aged...after that was done, I sat down with my Sure Cuts a Lot again, and designed all the words/fonts...took more time than I thought, but worth it in the end. Once all were chosen, I cut them out with my cricut out of bazzill cardstock, ran them through my xyron and carefully placed them on the dried canvas...once all were on, I mod podged over the whole thing twice, allowing to dry in between...ok, maybe I helped it with my heat gun...Here is a picture of the porch with the finished piece
 Next was a set of old wood windows I was just itching to use. They had been previously painted and distressed when we still lived in our other house, but the colors worked perfect for my bathroom in the new house. Previously I had pieces of scrapbook paper in the panes with words on them, but they got damaged in the move, so I pulled that out and replaced them with cardboard inserts covered with fabrics that match my shower curtain, which I also made for our last house, but I love it, so I kept it.

Love this sign...basically just used a wood sign from the dollar store, painted it and then mod podged the scrapbook paper and wording on, and hung it on a beautiful hanger purchased from Hobby Lobby, at 50% off , of course

Thursday, September 6, 2012

I'm Baaaaaaaack...lol

Wow, its been a while since I was here...crazy summer...we sold our house, then moved into a rental house...who'd thought we were so picky...still hunting for the perfect home...ahem...anyway, between the move and work, who had time to craft?? Certainly not me...and even though I am working with a limited number of supplies...I did keep out a box of my faves (thanks to my friends suggestion) so I can at least quench the need to be creative until we are in our own place and I am in my wonderful scrap room!!! Yay!!! I happened to pop into the cricut mb last night and knew once I had visited RAQ's card challenge, I had to make a card.  Papers are from a new pad I bought from the Paper Studio...all kraft designs...love it...so raw and natural. Oh and yes, I am working on Christmas cards already....mostly because I plan to be decorating in the new house, and won't have time to do cards then...

Tuesday, May 15, 2012

Let your Light Shine!!!

I am loving making these cards...again inspired by Heather Tedford...check out her blog...such beautiful cards. This one I made myself...no copying this time...lol...so happy with the way it turned out. The stamps are all "Perfect Day" from CTMH...thanks for looking!

Friday, May 11, 2012

Back to Card Making...


Finally done my Florida scrapbook, and now back to some card making...ordered some cards from a friend who is a Close To Mty Heart consultant, couple that with an extraordinary blog I found and these cards were born...THESE ARE NOT ORIGINAL IDEAS...copied them from this blog, she is so very talented, and of course, now I had to order more stamps so I can continue this beautiful technique

Thursday, April 26, 2012

Headboard

This is my headboard...wanted to redo it to match the small dresser I just finished...so basically followed the same steps as shown below in the dresser post.  Painted with Fiesta Red...two coats, waxed in spots, and then two coats of cream, then sanded. The windows are covered in textured fabric, that I folded over to the back for a clean edge and then hot glued to the window, since they were already painted. The shutters I picked up at a yard sale 4 for 2.00 last summer and have been meaning to do something with them...so here is the finished product...


Tuesday, April 24, 2012

Dresser Makeover

 Above is the original dresser...now...I bought this at a yard sale about 6 years ago for $5.00 and the lovely stenciling on it I did after I bought it...it served its purpose for many years, but with a new color scheme in my bedroom, it needed a makeover
 First two coats were a color called Fiesta Red by Color Your World...our living room was this color for a few years and I had a jar of leftover paint...yay...and my comforter has deep red flowers in it. so it is perfect.
Next, above...I took one of dh's candles, and rubbed it all over where I wanted the red to show through after the next coat...then above right, I painted with cream over the wax...needed two coats ...let it dry completely while I cut the grass and made dinner
 Here are the drawers after the second coat of cream
Tada....here is the finished product...after I sanded of course...I am so pleased with the finished product, and it looks wonderful in the bedroom...tomorrow is shopping for some fabric, and then on the old window headboard that dh did himself, but again the colors don't match, so it will receive the same treatment as this dresser. At the ends will be two old shutters I picked up at a yard sale for 1.00 to make it as long as my bed...will post when done

Friday, April 20, 2012

Florida Scrapbook

Whew...feel like its been so busy as of late...but I am almost done my Florida Scrapbook, about 5 more layouts to go, but I was anxious to share some of the completed layouts with you. Above is the first page...I know its hard to see, but the small strips are major cities along the way, with the time and temperature...the paper is a Florida map that I bought while down south.

This is the place we stayed...loved it, right on the beach

We went to St Petersburg to the Morean Gallery to see the Chihuly Collection...loved that...most of the photos are from a brochure as pictures were not allowed in the gallery

I think we hit this flea market 5 times in the 14 days we were there...huge, we've got nothing like this in Canada

The Pier in St Pete's...

The Long Pier, walking distance from our hotel...all kinds of wildlife and juts quite far out into the Gulf

Went to see Manatee....toooooo exciting...

Eeeeeeeeeekkkkkkk....love these gentle giants...soooooo cool to see so many of them in the wild

Beach shots

Here we rented scooters for a morning...what a blast that was...we drove from North Redington Beach to Clearwater, and back to Treasure Island...
When Rebecca and Max arrived, Dave and the kids took out the kayaks on a rather windy, wavy day...they all tipped them, but they had fun


Took some very old chip letters that were pink and black with designs on them, and painted them with Tim Holtz crackle paint...I think I need this paint in every color...love this product

Some embossing and sanding...

Starfish bought at a local shell store..

The "A" sandcastle was glued and covered in actual sand I brought home from the beach...and inked halfway up my title

Thanks for looking...most of the pages were inspired by the Page Maps books I have, love them for inspiration...the last few will be posted when I get them all done.